I got bored last night and started researching OpenWRT. There is no particular feature that it supports, that my current router firmware doesn’t, but I haven’t looked into the project in at least 10 years.
I currently run an ASUS AX-3000, which I bought because I thought my old Netgear X8 R8300 was malfunctioning, but when I had the same issue with the ASUS, I found it was a config problem. Since the Netgear is just sitting in the basement, I though I’d install OpenWRT on that first and then see if it’s worth it to install on the ASUS. The Netgear is a little more high end of a router, but it doesn’t have WiFi 6. The ASUS does, but has one less radio, so I’ll need to see how they perform.
Unfortunately, neither router has images prebuilt for it, so I had to build my own image. Luckily there was already a profile for an R8500, which hardware wise is almost identical to the model I have.
The build environment setup and instructions can be found here. It was a simple matter of firing up a Ubuntu VM and following along. I can’t flash it while I’m at work, so that will have to wait.
The most annoying thing with getting this setup is how confusing the OpenWRT documentation is. I can see why they would organize it this way. It seems to me that unless you have a router that one of the maintainers owns, you are left with manual. Even though it’s just linux, so you really just need the hardware support to get up and running. I would think a more broad generic image to test things would make more sense. Oh well.
cweb@testvmhost:~/openwrt-imagebuilder-bcm53xx-generic.Linux-x86_64$ make image \
PROFILE="netgear_r8500"
Generate local signing keys...
WARNING: can't open config file: /builder/shared-workdir/build/staging_dir/host/etc/ssl/openssl.cnf
WARNING: can't open config file: /builder/shared-workdir/build/staging_dir/host/etc/ssl/openssl.cnf
read EC key
writing EC key
Checking 'true'... ok.
Checking 'false'... ok.
Checking 'working-make'... ok.
Checking 'case-sensitive-fs'... ok.
I’ve been wanting to switch my server setup to something virtual for a while now. I upgraded my “gaming” desktop to 32GB of RAM, but it was kind of pointless after I did some research. A processor, motherboard, and 32 GB of DDR4 RAM isn’t that much more. Then I got to wondering how much it would be just to put something together, and I came out under $500. Hmm, I waste more than that in a week sometimes.
I also tested out Fedora server as a Host system. I can’t say I really liked Cockpit at all.
I’m testing ubuntu right now, probably with virt-manager.
This ended up being a lot more research for very little change, but I’m happy so far. I may still adjust some colors, but other than that I’m happy.
What I ended up spending the most time on was a simple feature that required php code to work. I wanted to set the first image in the post as the WP Feature Image for the post. I am really surprised this feature isn’t part of word press to be honest.
Here is the code that I had to add to my functions.php file.
// add support for Feature Image.  Pobably redundent as it should be in parent theme
add_theme_support( 'post-thumbnails' );

// // autoset_featured is a function that sets the featured image to the first image in the post
function autoset_featured() {
    global $post;
    $already_has_thumb = has_post_thumbnail($post->ID);
    if (!$already_has_thumb)  {
        $attached_image = get_children("post_parent=$post->ID&post_type=attachment&post_mime_type=image&numberposts=1" );
            if ($attached_image) {
                foreach ($attached_image as $attachment_id =>
                $attachment) {
                    set_post_thumbnail($post->ID, $attachment_id);
                }
            }
        }
    }
add_action('the_post', 'autoset_featured');
add_action('save_post', 'autoset_featured');
add_action('draft_to_publish', 'autoset_featured');
add_action('new_to_publish', 'autoset_featured');
add_action('pending_to_publish', 'autoset_featured');
add_action('future_to_publish', 'autoset_featured');
Unfortunately, there was several hours of research and missteps to get this working properly, and the way I wanted.
I started by reading the first several sections of the WordPress Developer Theme Handbook. This was more interesting than you’d think, and I know how a much better idea about where things go. Specifically, the functions.php file(in my child theme, which I now know I should create).
Then I found this person’s code and just copy and pasted it. Which sounds lazy, but I know what all the code does at the moment, which is nice.
I haven’t been happy with any of the themes I have installed on this site since I started it. WordPress sent a notice about the new 2025 default theme and it looks pretty nice, but still is not what I want. I’ve decided to just figure out how to create my own so I’ll stop getting like 70% of the way there only to find that I can’t change what I want to change. I started messing around but it was really annoying trying to test things out and not break the site at the same time. Luckily I still have chrisweber.online so I’ll setup a test site on that. Actually, I’ll probably just copy over the Zion site to it for testing.
I’m hoping if I read through a couple tutorials on how the templates work and get at least something basic completed this week.
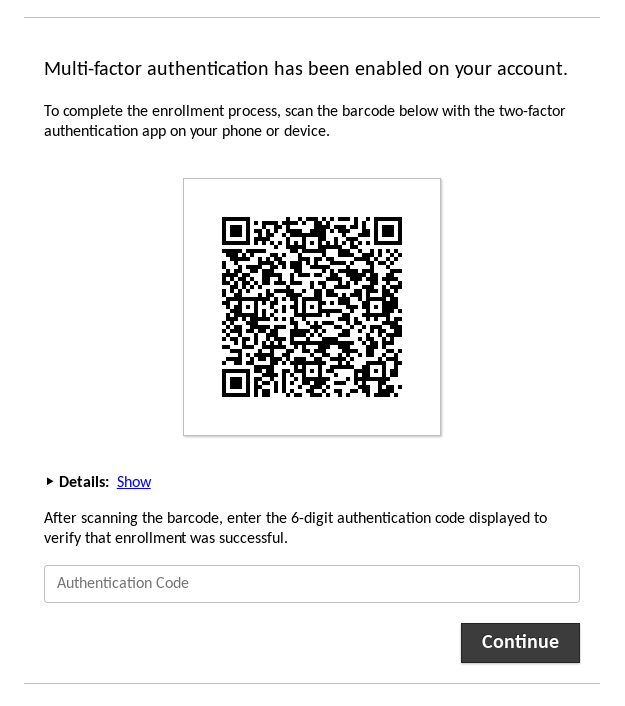
Well, that was easy. I literally just copied over the jar file and restarted guacd, apache2, and tomcat9. After that I just logged out and back in to enroll in TOTP.
I did find unfortunately that the KeePass app I’m using on Android doesn’t seem to sync things both ways. Entries I create on my phone do not see to be able to sync to google drive, but that just took me a second to work around. It’s not really a big deal but it meant I had to manually enter in the secret key and such. Guac TOTP supports QR codes, and I was able to add it with my phone, but wasn’t able to get it to sync back to my computer(after five minutes of trying). That may be a project for another day.
I’ve decided with all the convience features I’ve got setup on the computers I remote into, that I should probably attempt to setup TOTP on the site to improve the security of the system. The password and username I use hasn’t been involved in any leaks that I know of, and both are unique to the site, plus you’d need the passwords to the actual computers too, but I figure it’s better safe than sorry.
The first step is to configure a database authentication extension. One nice thing about this change is that it will allow me to modify connections and user settings in the web interface, instead of connecting to SSH and modifying an XML file, and then restarting guacd.
The first step is to install the JDBC connector for mysql, which went without a hitch with
Now to create the database, which they are providing scripts to create the schema which saves a whole lot of copy/pasting. So, sign into mysql as root, create the DB, and import the schema.
cweb@thecweb:/media/store/mysql$ sudo mysql -u root
Welcome to the MySQL monitor.  Commands end with ; or \g.
Your MySQL connection id is 3362
Server version: 8.0.39-0ubuntu0.24.04.2 (Ubuntu)

Copyright (c) 2000, 2024, Oracle and/or its affiliates.

Oracle is a registered trademark of Oracle Corporation and/or its
affiliates. Other names may be trademarks of their respective
owners.

Type 'help;' or '\h' for help. Type '\c' to clear the current input statement.

mysql> CREATE DATABASE guacamole_db;
Query OK, 1 row affected (0.01 sec)

mysql> show databases;
+--------------------+
| Database           |
+--------------------+
| cwOLzion           |
| guacamole_db       |
| information_schema |
| mysql              |
| performance_schema |
| sys                |
| wordpress          |
+--------------------+
7 rows in set (0.00 sec)

mysql> quit
Bye
cweb@thecweb:/media/store/mysql$ cat schema/*.sql | sudo mysql -u root guacamole_db
cweb@thecweb:/media/store/mysql$
Create the DB user.
cweb@thecweb:/media/store/mysql$ sudo mysql -u root
Welcome to the MySQL monitor.  Commands end with ; or \g.
Your MySQL connection id is 3371
Server version: 8.0.39-0ubuntu0.24.04.2 (Ubuntu)

Copyright (c) 2000, 2024, Oracle and/or its affiliates.

Oracle is a registered trademark of Oracle Corporation and/or its
affiliates. Other names may be trademarks of their respective
owners.

Type 'help;' or '\h' for help. Type '\c' to clear the current input statement.

mysql> CREATE USER 'guacamole_user'@'localhost' IDENTIFIED BY '****';
Query OK, 0 rows affected (0.02 sec)

mysql> GRANT SELECT,INSERT,UPDATE,DELETE ON guacamole_db.* TO 'guacamole_user'@'localhost';
Query OK, 0 rows affected (0.01 sec)

mysql> FLUSH PRIVILEGES;
Query OK, 0 rows affected (0.00 sec)
Seems like that went welll, so copying over the JDBC driver and guac extension.
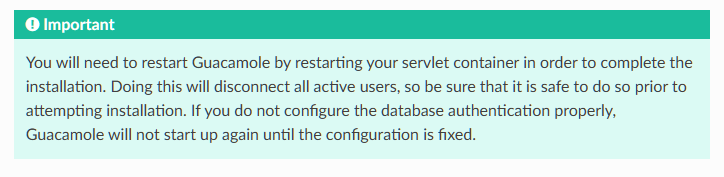
No surprises there, but I’m going to heed this warning message about restarting guac, because I’m at work and I don’t want to kill my session if I have something configured or installed incorrectly.
It’s config time
not sure this really applies since I’ve been using vi since the late 1900s
The basic config is just telling guacd how to connect to the DB, so we just need to specify the DB server, DB, user, and password. So creating the /etc/guacamole/guacamole.properties and adding that info.
And that is it for now. I need to restart the servlet, which will disconnect me, and if I configured things incorrect, also prevent me from signing back in. I’m going to research cooking a turkey for now, and maybe later I will see if this is working. I can always poke holes in the firewall for SSH, and forward port 22, but I’d rather not just because of the immediate hacking attacks that will likely insue.
Part 2
Ok, I got bored with reddit so I poked some holes for SSH and restarted everything, and it came back up fine. Looking at /var/log/auth.log, I was a little surprised to find my paranoia was unfounded and I didn’t see a single authentication attempt during the five minutes my stupid little SSH server was accessible from the internet. Though, I guess it’s pretty unlikely that I would happened to be scanned during that short amount of time.
Now for the bad news… I can’t sign in with the guacadmin account it supposedly created in the DB. To the log files!
I checked the mysql log first, and found not connection attempts. I then checked the tomcat logs and found that the JDBC driver is not loading for some reason.
[2024-11-08 06:41:39] [info] 06:41:39.629 [main] ERROR o.a.g.extension.ProviderFactory - authentication provider extension failed to start: No JDBC driver for MySQL/MariaDB is installed.
So I first go to check permissions on the file and realize that I copied the jar file to /etc/guacamole/extensions/lib instead of /etc/guacamole/lib, so fixing that and restarting everything again.
And it works! I had to recreate my user account and all the connections, but it was a lot easier with the admin GUI.
Fancy that!
Taking another break to read about TOTP setup and reddit.
I’m not really surprised he won. I mean the poll numbers were pretty clear that he was going to win. I thought I would be a lot more disappointed, but I find myself overcome with morbid curiosity. I don’t really believe he’ll be able to get a second term, or turn America into a dictatorship, so I’m going to really enjoy reading about all the escapades of his administration.
Of course I could be wrong about that too, so who knows.