Author: cweb
-
Python interface to Kasa Devices
The starting point for this project is the Kasa powerstrip I posted about, like a month ago. I’m trying o code up something to log power levels directly to a mysql db.
Both seem to have good documentation on how to use them.
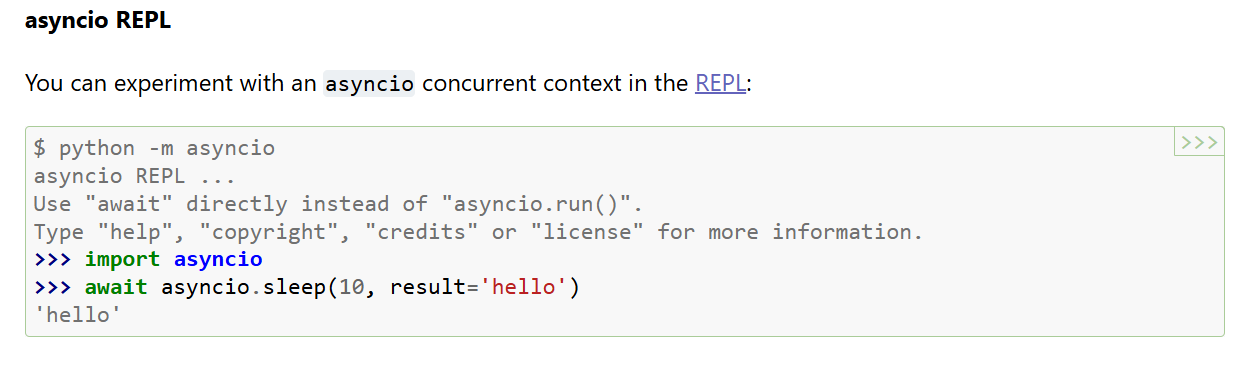
The kasa library requires asyncio, which I haven’t really messed with async programing before, so I get to learn some new concepts. Though what little I know tells me it’s just a way to keep a connection open while waiting on the other end to respond.
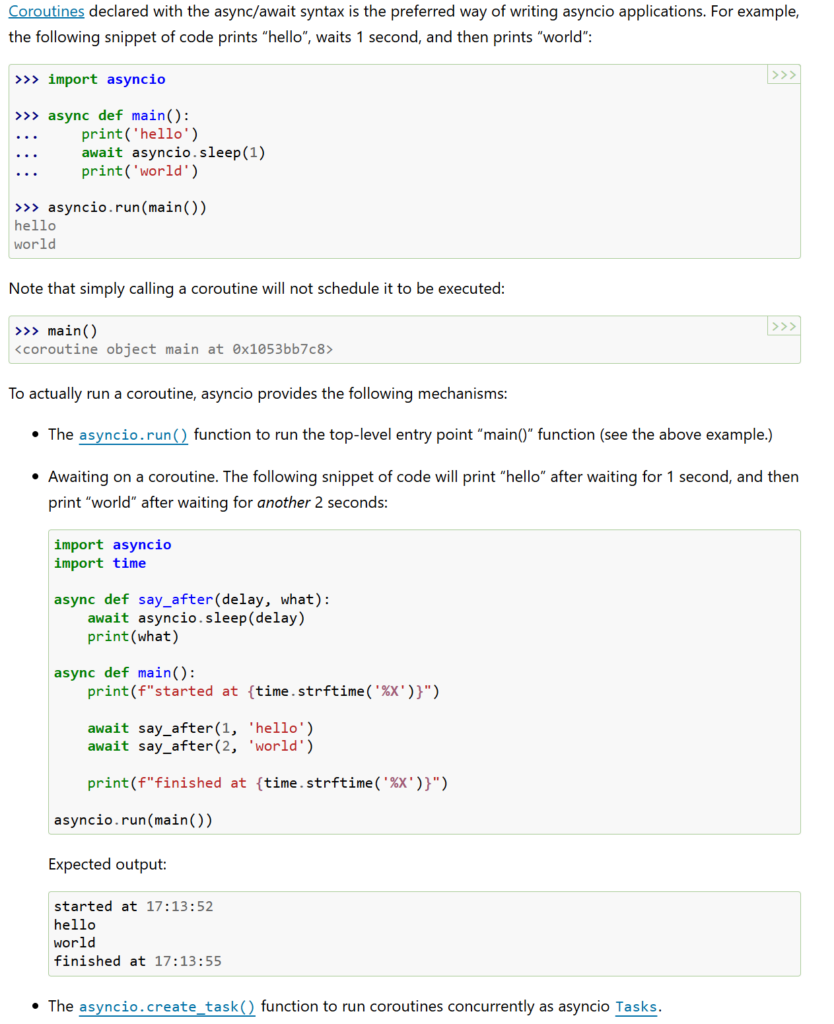
asyncio is a library to write concurrent code using the async/await syntax.
asyncio is used as a foundation for multiple Python asynchronous frameworks that provide high-performance network and web-servers, database connection libraries, distributed task queues, etc.
https://docs.python.org/3/library/asyncio.htmlThis is really all I need to know, I think.
I’ve slapped together this to print the data I want with python
import asyncio
from kasa import Discover

async def main():
    dev = await Discover.discover_single("powerstrip.lan")
    await dev.update()

        # possible features:
        # state
        # rssi
        # on_since
        # reboot
        # led
        # cloud_connection
        # current_consumption
        # consumption_today
        # consumption_this_month
        # consumption_total
        # voltage
        # current

    state = dev.features.get("state")
    voltage = dev.features.get("voltage")
    current = dev.features.get("current")
    current_consumption = dev.features.get("current_consumption")
    consumption_this_month = dev.features.get("consumption_this_month")
    consumption_today = dev.features.get("consumption_today")

    # open file and write values
    f = open("power.txt", "w")
    f.write(f'Power On: {state.value}<br>{voltage.value} V {current.value} A {current_consumption.value} W<br>Today: {consumption_today.value} kwh<br>This Month: {consumption_this_month.value} kwh')

if __name__ == "__main__":
    asyncio.run(main())
Which gives me this in WordPress:
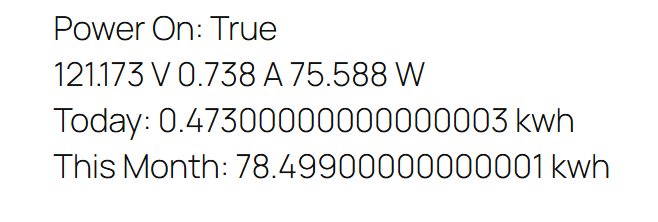
Not directly of course, I haven’t gotten that far yet. For now, the python writes a text file with HTML tags for display. I have an hourly cron job that uses scp to copy the file over to /var/www, and then some php in my functions.php file to load the file, and display it as a wordpress shortcode.
The stupid WordPress part took the longest, but I understand the layout of wordpress a little better. It has been around and popular for so long, that it is easy finding well written documentation, but I’ve found that a lot of it is outdated. It is very annoying to read through something, try it out, and then find your error is because you’re trying to use a deprecated feature.
The vision is a cron job that runs a python script to import data directly into the DB, and then php pulls the data from the DB, but the next step is to just get something into to DB.
-
enter the virtual
I’m in the process of cleaning up my gaming PC, so it is easier to virtualize. The C: drive has grow over the years to 153 GB of crap. Naturally, I found the opensource Bulk-Crap_uninstaller. I was monkey’n around in Visual Studio 2022 already, so I was able to clone it from github and compile it with a handful of clicks. It is pretty nice. I wish I had found it before I spent like an hour manually uninstalling things.
-

thecweb to DB DP
I finally decided on CentOS and Cockpit for the VM Host. Which is quite surprising. I have naturally used RedHat Enterprise and clones at work for quite some time, but I haven’t given them another look since they first started with Cockpit, and man is it slick now. Some clarification I needed to arrive at this decision is what CentOS actually IS. It is basically a stable release of RHEL. The next upcoming release, so they give that out for free for people to test before they release it to paying customers. I did not know that it is made by RH engineers, and I never really saw myself ever using a RH derived distro since I abandoned them in the late 90s.
Anyhoo, back to what this post is actually about, the DB migration. I was trying to come up with a clever name that rhymed with DB and DP came to mind, so we get this completely tasteless image and server name DBDP. If you are not familiar with the reference – then good – you’ve lived a good life.
I configured the new VM Guest with 8 cores and 32 GB of RAM. This is probably overkill, but it will allow me to do stupid things and “probably” not take out my website db in the process.
Ubuntu Server 24 LTS is the OS, and I’m switching from mysql to mariadb. Honestly, I don’t know why I even chose mysql. I wouldn’t have if I remembered that it was now owned by Oracle, part of the Sun acquisition. It is my opinion that Oracle was and continues to be everything that MS was made out to be during the anti-trust cases of the 90s. Actually, I just googled and it wasn’t settled until 2001, but it started in 1990.

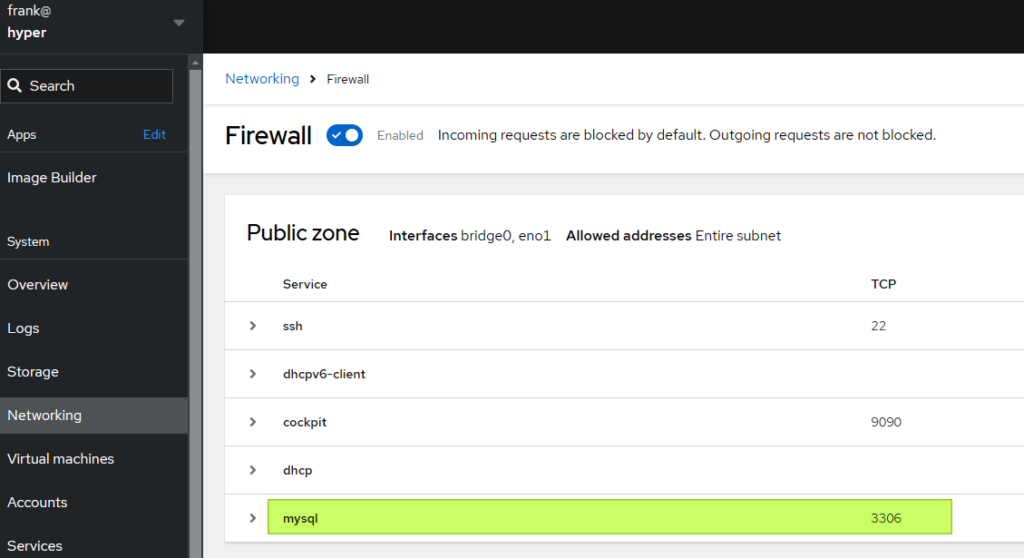
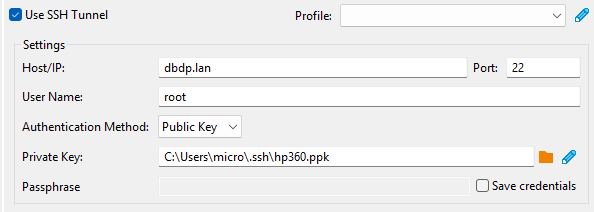
I just used the regular server netinstall iso I used for the old db server, only the 24 version, and so far I’ve just the mariadb-server package. Side note, /var/log/apt/history.log next time you can’t remember what you’ve installed with apt. I setup a winscp connection for root and copied over the keys for password-less login. Added a rule for mysql in the fancy-shmancy pit of cocks.
Fire up DBeaver and connect to mariadb as root over SSH, so I can create a dev account on the DB.
Which of course did not allow me to connect. Mariadb by default doesn’t even allow local connections over tcp/ip, I find after much confusion. So I add this to /etc/mysql/my.cnf.
[mysqld]
skip-networking=0
skip-bind-address
Same as mysql, accounts are tied to hosts, and root is tied to local host, so I still won’t be able to connect with root even over ssh, apparently. So I’ll create a development user that is close to root, and I managed to do it without much googling thanks to an earlier post.
CREATE USER 'cwebdev'@'%' IDENTIFIED BY '*****';

GRANT CREATE, ALTER, DROP, INSERT, UPDATE, DELETE, SELECT, REFERENCES, RELOAD on *.* TO 'cwebdev'@'%' WITH GRANT OPTION;
Yay! DBeaver is connecting.
And now it’s a few minutes until one am, and I’m hungry. Off to WhataBurger and then I’ll dick-around with loading info from that kasa power strip.
-

VM Host search continues
The cats weren’t around when I fed them yesterday. I noticed that the back porch light was on so I glanced out to take a look, around two in the morning I think.
Anyhoo, I bought the vm host hardware and it is setup. Arch was way to much manual work, though it is ideal if I really want to do things MY way… But, MY way would be a gruesome sojourn into masochism, for nothing but LFS would really be my way, and if I don’t have time or patience for Arch, MY way isn’t feasible.
So far, I’ve built the Arch system, Debian system with KVM/QEMU/Libvirt, Proxmox(disappointment for the hype), and I just started a Ubuntu server LTS build. Fucking Broadcom, killed another with their VMWare purchase. It would be some much easier to use ESXi.
-
Programmable Search Engine
I just found out about this programmablesearchengine.google.com site. It is for adding a custom site search bar to you website, but it also allows you to just do a regular google search on the web, and then include and exclude up to 500 sites, so it seems like the perfect way to configure some searches for specific tasks.
-
SQL – notes
create user
CREATE USER '<username>'@'<connect from hostname>' IDENTIFIED BY '<password>';grant access
# basic syntax
CREATE USER '<username>'@'<connect from hostname>' IDENTIFIED BY '<password>';

# as close to root without being root
# probably shouldn't be giving any user this much access
GRANT CREATE, ALTER, DROP, INSERT, UPDATE, DELETE, SELECT, REFERENCES, RELOAD on *.* TO '<username>'@'<connect from hostname>' WITH GRANT OPTION;
database
create database <databasename>;

show databases;
Inserting data
# INSERT INTO Syntax # It is possible to write the INSERT INTO statement in two ways: # 1. Specify both the column names and the values to be inserted: INSERT INTO table_name (column1, column2, column3, ...) VALUES (value1, value2, value3, ...); # 2. If you are adding values for all the columns of the table, you do not need to specify the column names in the SQL query. However, make sure the order of the values is in the same order as the columns in the table. Here, the # INSERT INTO syntax would be as follows: INSERT INTO table_name VALUES (value1, value2, value3, ...); -

$40 Kasa HS300 Smart Power Strip
I impulse-bought 2 of these because it seemed like exactly what I needed for a couple projects. 6 individually controlled power outlets, and three always on USB ports. Each port monitors voltage and amps. And I even found a Python library that controls it and all the other Kasa smart devices I own. 😍
And look here. An official MySQL Python Connector.
So, this is a start.
# commented out code is example code...  for now
import asyncio
from kasa import Discover

async def main():
    # dev = await Discover.discover_single("127.0.0.1",username="un@example.com",password="pw")
    # me no think me need login
    dev = await Discover.discover_single("192.168.1.230")

    # await dev.turn_on()
    # await dev.update()
    # me just want Info for now
    devInfo = dev.hw_info
    print(type(devInfo))
    print(devInfo)

if __name__ == "__main__":
    asyncio.run(main())
which gives me this
<class 'dict'>
{'sw_ver': '1.0.12 Build 220121 Rel.175814', 'hw_ver': '2.0', 'mac': 'B0:19:21:DF:80:D0', 'mic_type': 'IOT.SMARTPLUGSWITCH', 'hwId': '955F433CBA24823A248A59AA64571A73', 'oemId': '32BD0B21AA9BF8E84737D1DB1C66E883'}
I could probably use this command to populate the device table with ease.