
Gates and Linus meet for the first time. “boy, we sure fought a lot when we were younger”
I wonder what Gates even says?
“hey, I spent millions trying to destroy your life’s work, but we gud?”

Gates and Linus meet for the first time. “boy, we sure fought a lot when we were younger”
I wonder what Gates even says?
“hey, I spent millions trying to destroy your life’s work, but we gud?”

Don’t remember if I ran this “semanage port -a -t milter_port_t -p tcp <port>”
The main config file for this is /etc/opendkim.conf, and we’ll get to that in a bit. I’m actually not even using OpenDKIM per se, but the milter. milter being a portmanteau of mail and filter. The milter adds a signature signed with a private key to each email sent through it. So postfix sends to local port for opendkim, and opendkim does its thing, and sends it to the internet(or possibly back to postfix, I can’t remember, and I am writing this weeks after the fact).
After I read enough to understand how it worked, the official documentation was most useful in configuring snail. You generate a public/private key pair, publish the public key as a text record, and use the private key to sign messages you are sending. This provides cryptographic proof that the email came from a server authorized to send main from the domain. The selector being part of the key generation and the published DNS record.
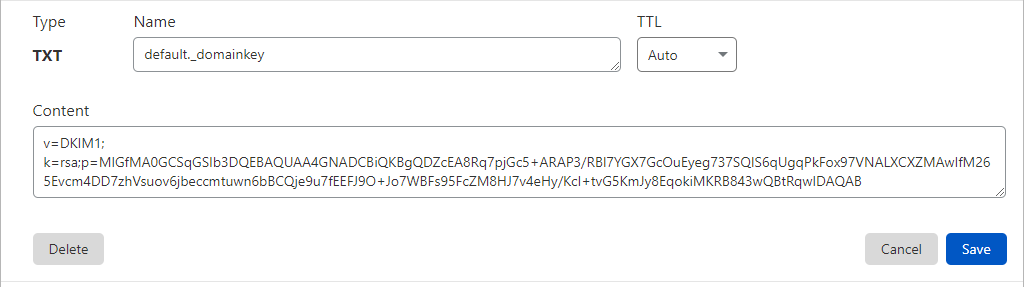
I find it makes most sense to start with the DNS record, which is in the format:
SELECTOR._domainkey.DOMAINSELECTOR is whatever you want, but some say the convention is to only have your cert valid for a month, and name it the month and year or some shit, but no, I’m too lazy. The selector relates to the cert file store on the system.
_domainkey just tells anyone looking for the domain key that this is the text record they want.
do I really need to explain DOMAIN?
The cert is generated by running:
opendkim-genkey -s SELECTORThe private key is what Opendkim needs read access to, and I copied it to /etc/dkimkeys, which is the style in my distro.
It also spits out the text part of the text record, so I copy/pasto and it seems fine. It can be tested with this after the DNS is updated on the internet:
opendkim-testkey -d DOMAIN -s SELECTOR -k rsa.privateI had to change the following parameters in main.cf, which if you’re following so far I don’t need to explain:
Domain			<DOMAIN>
Selector		<SELECTOR>
KeyFile		/etc/dkimkeys/<cert>.private
This allows all hosts on the local subnet to use opendkim:
InternalHosts 192.168.1.0/24listening on inet socket:
Socket inet:8891@localhostAfter restarting Opendkim for the changes to take effect, we add some stuff to main.cf to tell postfix what’s up:
### OpenDKIM bullshit   ####
## should should document this better
milter_default_action = accept
milter_protocol = 2
smtpd_milters = inet:localhost:8891
non_smtpd_milters = inet:localhost:8891
The bottom two lines are as they appear in the docs. I don’t know what the top two do, and past chris being the lazy sack-o-shit that he is, the comments are no help. eh.
I looked through several tutorials on configuring postfix, but none of them really fit my situation, so after maybe a month of going through those with lackluster results, I ended up following the official documentation.
I started this configuration thinking I’d go for send and receive, but I broke receiving will getting sending to work, so receiving still points to namecheap, which just forwards everything to my spam gmail. I hope to revisit that at a later date.
To begin with, postfix configuration is stored in /etc/postfix/main.cf. And after giving up receiving, postfix doesn’t really need that much configuration to get working.
I decided the most logical setup was to have the system only configured to send and receive mail for the local system and domain(basically default install), and the rest of the config is done through the virtual mailbox config.
###  vmailbox with postfix accounts
virtual_mailbox_domains = <INTERNET DOMAINS>
virtual_mailbox_base = /var/mail/vhosts
virtual_mailbox_maps = hash:/etc/postfix/vmailbox
virtual_minimum_uid = 100
virtual_uid_maps = static:5000
virtual_gid_maps = static:5000
mailbox_domains tells the system which virtual domains to use,
mailbox_base is on the local filesystem, and is the parent of all mailboxes.
mailbox_maps goes to a hash of the file /etc/postfix/vmailbox, and it contains the email address-to-mailfile mappings(realtive to base), and must be hashed by the postmap command after changes are made.
the rest you can figure out.
the saga of how gmail reluctantly accepted zabbix alerts from my self hosted postfix server
Currently my email setup is quite simple. I have three domain names, and have them all set to forward incoming email to my spam Gmail account. Then I use rules on the to: field to label them as they come in. It works quite well for pretty much every thing I need, with the exception of sending emails. And sending isn’t really a need, but it would make a lot of things easier. Anything from critical alerts to posting on this very WordPress site could be automated if I could send out email, and actually have it delivered. That is much more difficult than receiving. MS and google have pretty much made it so you can’t use your own email server and get it delivered to the inbox, maybe spam if you do everything right. I started this post a month or two ago. I’m not sure when exactly, but the last time I created the VM qcow was March 28.
I’m now writing the actual posts, which should be two, possibly three posts, so that I can refer to them later with ease. Postfix and OpenDKIM. Possibly one to tie them all together. Might be simpler to have it in one, but this is where I’m starting from my pages of notes and poorly labeled screenshots.
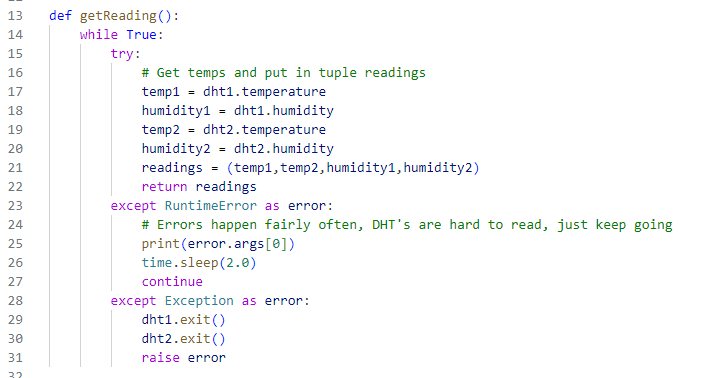
For my indoor garden I wanted to monitor the temperature inside and outside the tent. It is in the basement, which I don’t think ever gets above 70 or below 50, but to control the plant’s cycles I need to control light and temp. The light came with an App so I just needed to get temp data into my database. Here is the code I’m using at the moment. I’d also like to log outside temperature data, but I haven’t figured that out yet. I’m think there has got to be an API for the NWS that I can put in a zip code and get the temp and humidity. Here is the code, and some notes.
We need to get some libraries and connect to the sensors.

I have two functions. One to get the data from the sensors, and one to insert the data into the database.

Where the magic happens

and some cleanup

So I calculated the space needed by putting 10 readings in the db, and if the average holds(which it should only go down) I will use about 840 MB a year to get a reading every minute, which I don’t really think I would need, so I’ll probably lower it to once an hour maybe later.

1638 average row size, in bytes(i think)
so 1.6kb a reading.
60 minutes * 24 hours * 1.6kb = 2,304kb a day
2.3MB * 365 = 839.5MB a year
The starting point for this project is the Kasa powerstrip I posted about, like a month ago. I’m trying o code up something to log power levels directly to a mysql db.
Both seem to have good documentation on how to use them.
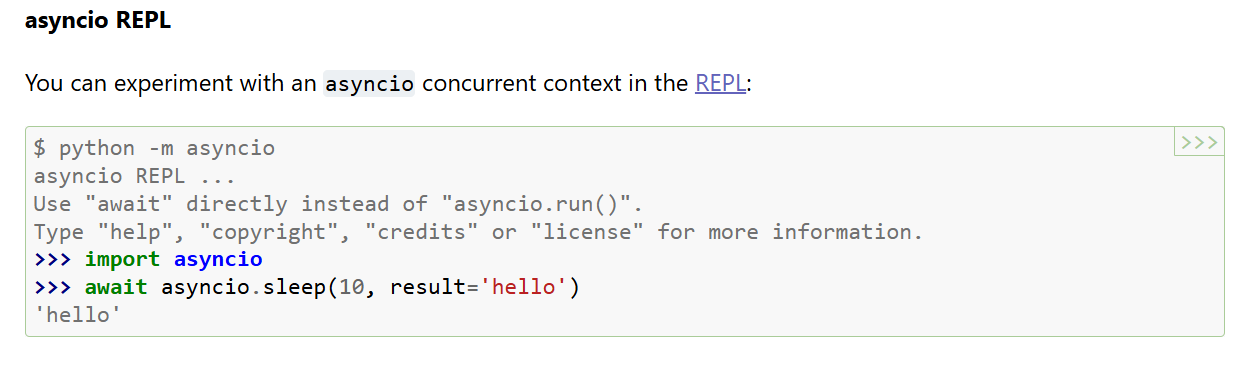
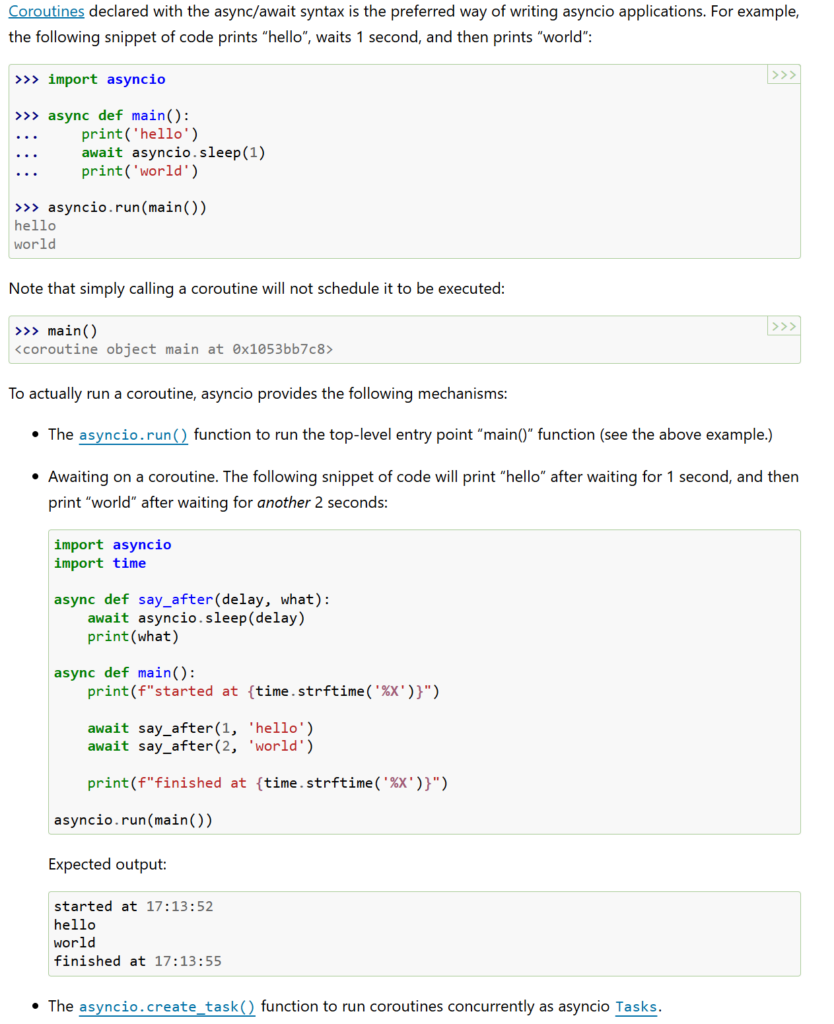
The kasa library requires asyncio, which I haven’t really messed with async programing before, so I get to learn some new concepts. Though what little I know tells me it’s just a way to keep a connection open while waiting on the other end to respond.
asyncio is a library to write concurrent code using the async/await syntax.
asyncio is used as a foundation for multiple Python asynchronous frameworks that provide high-performance network and web-servers, database connection libraries, distributed task queues, etc.
https://docs.python.org/3/library/asyncio.html
This is really all I need to know, I think.
I’ve slapped together this to print the data I want with python
import asyncio
from kasa import Discover

async def main():
    dev = await Discover.discover_single("powerstrip.lan")
    await dev.update()

        # possible features:
        # state
        # rssi
        # on_since
        # reboot
        # led
        # cloud_connection
        # current_consumption
        # consumption_today
        # consumption_this_month
        # consumption_total
        # voltage
        # current

    state = dev.features.get("state")
    voltage = dev.features.get("voltage")
    current = dev.features.get("current")
    current_consumption = dev.features.get("current_consumption")
    consumption_this_month = dev.features.get("consumption_this_month")
    consumption_today = dev.features.get("consumption_today")

    # open file and write values
    f = open("power.txt", "w")
    f.write(f'Power On: {state.value}<br>{voltage.value} V {current.value} A {current_consumption.value} W<br>Today: {consumption_today.value} kwh<br>This Month: {consumption_this_month.value} kwh')

if __name__ == "__main__":
    asyncio.run(main())
Which gives me this in WordPress:

Not directly of course, I haven’t gotten that far yet. For now, the python writes a text file with HTML tags for display. I have an hourly cron job that uses scp to copy the file over to /var/www, and then some php in my functions.php file to load the file, and display it as a wordpress shortcode.
The stupid WordPress part took the longest, but I understand the layout of wordpress a little better. It has been around and popular for so long, that it is easy finding well written documentation, but I’ve found that a lot of it is outdated. It is very annoying to read through something, try it out, and then find your error is because you’re trying to use a deprecated feature.
The vision is a cron job that runs a python script to import data directly into the DB, and then php pulls the data from the DB, but the next step is to just get something into to DB.
I finally decided on CentOS and Cockpit for the VM Host. Which is quite surprising. I have naturally used RedHat Enterprise and clones at work for quite some time, but I haven’t given them another look since they first started with Cockpit, and man is it slick now. Some clarification I needed to arrive at this decision is what CentOS actually IS. It is basically a stable release of RHEL. The next upcoming release, so they give that out for free for people to test before they release it to paying customers. I did not know that it is made by RH engineers, and I never really saw myself ever using a RH derived distro since I abandoned them in the late 90s.
Anyhoo, back to what this post is actually about, the DB migration. I was trying to come up with a clever name that rhymed with DB and DP came to mind, so we get this completely tasteless image and server name DBDP. If you are not familiar with the reference – then good – you’ve lived a good life.
I configured the new VM Guest with 8 cores and 32 GB of RAM. This is probably overkill, but it will allow me to do stupid things and “probably” not take out my website db in the process.
Ubuntu Server 24 LTS is the OS, and I’m switching from mysql to mariadb. Honestly, I don’t know why I even chose mysql. I wouldn’t have if I remembered that it was now owned by Oracle, part of the Sun acquisition. It is my opinion that Oracle was and continues to be everything that MS was made out to be during the anti-trust cases of the 90s. Actually, I just googled and it wasn’t settled until 2001, but it started in 1990.

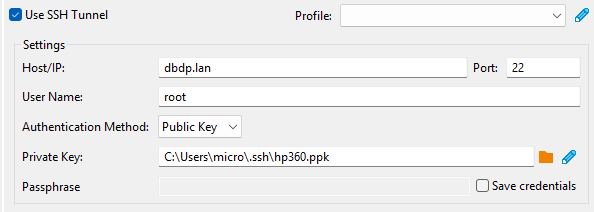
I just used the regular server netinstall iso I used for the old db server, only the 24 version, and so far I’ve just the mariadb-server package. Side note, /var/log/apt/history.log next time you can’t remember what you’ve installed with apt. I setup a winscp connection for root and copied over the keys for password-less login. Added a rule for mysql in the fancy-shmancy pit of cocks.
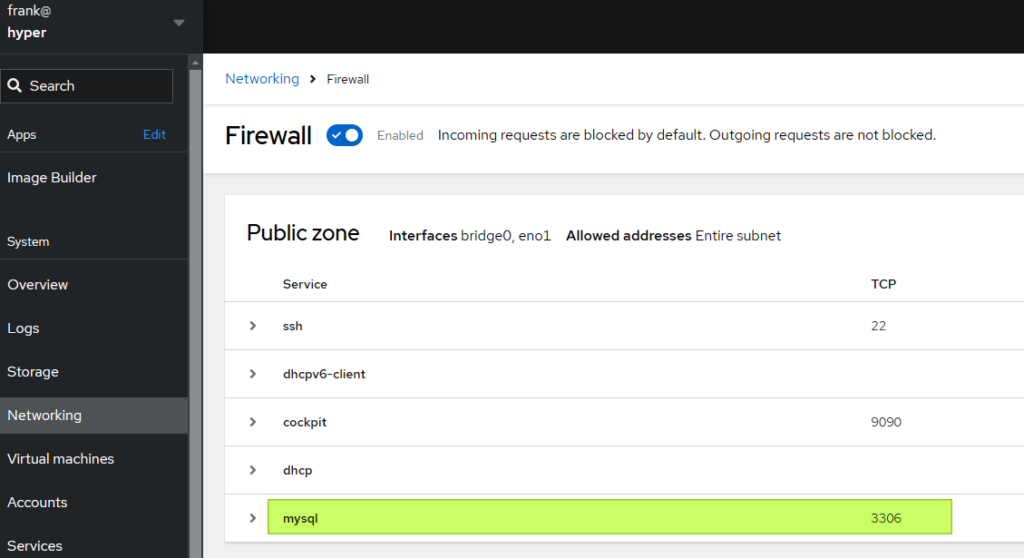
Fire up DBeaver and connect to mariadb as root over SSH, so I can create a dev account on the DB.
Which of course did not allow me to connect. Mariadb by default doesn’t even allow local connections over tcp/ip, I find after much confusion. So I add this to /etc/mysql/my.cnf.
[mysqld]
skip-networking=0
skip-bind-address
Same as mysql, accounts are tied to hosts, and root is tied to local host, so I still won’t be able to connect with root even over ssh, apparently. So I’ll create a development user that is close to root, and I managed to do it without much googling thanks to an earlier post.
CREATE USER 'cwebdev'@'%' IDENTIFIED BY '*****';

GRANT CREATE, ALTER, DROP, INSERT, UPDATE, DELETE, SELECT, REFERENCES, RELOAD on *.* TO 'cwebdev'@'%' WITH GRANT OPTION;
Yay! DBeaver is connecting.
And now it’s a few minutes until one am, and I’m hungry. Off to WhataBurger and then I’ll dick-around with loading info from that kasa power strip.

The cats weren’t around when I fed them yesterday. I noticed that the back porch light was on so I glanced out to take a look, around two in the morning I think.
Anyhoo, I bought the vm host hardware and it is setup. Arch was way to much manual work, though it is ideal if I really want to do things MY way… But, MY way would be a gruesome sojourn into masochism, for nothing but LFS would really be my way, and if I don’t have time or patience for Arch, MY way isn’t feasible.
So far, I’ve built the Arch system, Debian system with KVM/QEMU/Libvirt, Proxmox(disappointment for the hype), and I just started a Ubuntu server LTS build. Fucking Broadcom, killed another with their VMWare purchase. It would be some much easier to use ESXi.

This system is too butt-ass-naked to be useful, even just as a hypervisor, so more fuck’n around.
more packages to install:
sudo
create user
useradd -m frank
passwd frank
here I realize I don’t have a network connection
en01 is now detected as eth0, for one, so edited /etc/systemd/network/20-wired.network to fix that.
# enable NetworkManager
systemctl enable NetworkManager
systemctl start NetworkManager

nmcli
Sweet. where was I?
I’ve got network, so I need ssh, because Hyper-V sucks for running linux. no copo pasto.
pacman -S openssh
systemctl enable sshd

pacman -S sudo
uncomment to allow users in wheel to sudo in /etc/sudoers
usermod -G wheel frankfinally, I can ssh in and copy and paste.
list of more packages to install:
posix wget zip unzip gzip libvirt qemu-base

https://wiki.archlinux.org/title/Installation_guide
Testing out minimal distros to run my hypervisor. Debian is fine and light enough, but the server doesn’t come for at least another day, so I’ve got time. I’ve been hearing about Arch for ever and I haven’t really looked into it, but it sounds exactly like what I’m looking for.
Arch boots into live cli environment, and then you have to manually partition the disk to start.
So, how do I want to do this?
Update the first partition must be the efi partition, and it cannot be in LVM, so do that first
fdisk /dev/sda
# g to create GPT table, n to make new, t to change type, and w to write
g
n
+1G
t
uefi
# make LVM partition
n

w
We should end up with something like this

Reddit has some ideas as usual. https://www.reddit.com/r/sysadmin/comments/1e4xnmq/linux_partition_scheme_recommendation_for_2024/
Looks like this list from open-scap is a good start. The rest is just standard linux crap.
reminder: pv = physical disk, vg = volume group, lv = logical volume
# list all physical volumes
lvmdiskscan

# create pv
pvcreate /dev/sda2

# display pv
pvdisplay

# summary
pvscan
vg
# create volume group
vgcreate rootVG /dev/sda

# add another pv to vg
vgextend rootVG /dev/sdc
lv
# create lv
lvcreate -L 2G rootVG -n bootLV
lvcreate -L 4G rootVG -n swapLV
lvcreate -L 8G rootVG -n rootLV
lvcreate -L 2G rootVG -n homeLV
lvcreate -L 4G rootVG -n varLV
lvcreate -L 4G rootVG -n varlogLV
lvcreate -L 4G rootVG -n varauditLV
lvcreate -L 2G rootVG -n vartmpLV
lvcreate -L 8G rootVG -n tmpLV

# create lv on specific pv
lvcreate -L 10G VolGroup00 -n lvolhome /dev/sda
mkfs
# boot partition is FAT32 - efi mandates as a standard
mkfs.fat -F 32 /dev/sda1
mkfs.fat -F 32 /dev/rootVG/bootLV

# swap
mkswap /dev/rootVG/swapLV

# the rest
mkfs.ext4 /dev/rootVG/rootLV
mount shit under /mnt. This better get less do-it-yourself real soon or I’m going back to debian. But, if I can slap these in a script I’ll be fine.
# mount root filesystem
mount /dev/rootVG/rootLV /mnt

# make all those mf mount points you just had to have
mount --mkdir /dev/rootVG/bootLV /mnt/boot
mount --mkdir /dev/rootVG/varLV /mnt/var
      and so on...

# enable swap
swapon /dev/rootVG/swapLV
Package list:
base linux linux-firmware vim efibootmgr grub intel-ucode
networkmanager dosfstools exfatprogs e2fsprogs ntfs-3g lvm2
sshd sudo
pacstrap -K /mnt base linux linux-firmwarefstab
# Generate an fstab file (use -U or -L for UUID or labels)
genfstab -L /mnt >> /mnt/etc/fstab
chroot to new install
# fancy smancy arch version of chroot
arch-chroot /mnt
set a bunch of shit you normally never have to…
# time zone
ln -sf /usr/share/zoneinfo/America/Chicago /etc/localtime

# hw clock
hwclock --systohc

# Edit /etc/locale.gen and uncomment en_US.UTF-8 UTF-8
# fuck, install vim with 'pacman -S vim' if you forget it
locale-gen

# Create the locale.conf(5) file, and set the LANG variable accordingly
echo LANG=en_US.UTF-8 >> /etc/locale.conf

echo archkvm >> /etc/hostname
net config
# install Network Manager - nmcli
pacman -S networkmanager

# add this stuff to /etc/systemd/network/20-wired.network
[Match]
Name=en01

[Link]
RequiredForOnline=routable

[Network]
DHCP=yes
initramfs
# because we are using LVM we need to create a new initramfs.  Also needed for encryption and RAID.
# edit /etc/mkinitcpio.conf
# remove udev and replace with systemd
# insert vlm2 between block and filesystems
HOOKS=(base systemd ... block lvm2 filesystems)

# rebuild image
mkinitcpio -P

# install lvm2 and rebuild again because it gave you an error about exactly that
pacman -S lvm2
mkinitcpio -P
root password
passwdinstall bootloader – I’m doing grub for now, but I may either put the /boot partition outside of LVM and load directly from UEFI.
# install grub and efibootmgr (if you haven't already)
pacman -S grub efibootmgr

# mount efi partition
mount --mkdir /dev/sda1 /boot/efi

# install grub
grub-install --target=x86_64-efi --efi-directory=/boot/efi --bootloader-id=GRUB

# make grub config
grub-mkconfig -o /boot/grub/grub.cfg
NOTE: it is here where you realize the efi partition can NOT be on an LVM partition, even though GRUB is fine with /boot being there. Starting over and updating notes. fml
cross fingers and reboot
# exit chroot
exit

umount -R /mnt

reboot
Aaaaannnd voila!!!
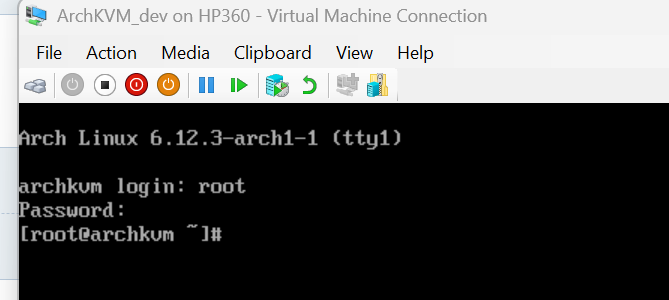
The most basic-bitch linux distro I’ve ever seen. Well, except for LFS, and I guess Gentoo was possibly worse because you had to wait five hours of compiling to realize you fucked up. But this is what I wanted. A Hypervisor should be very minimal.